Tuesday 24 April 2012

Dock Check

    "I'm a romantic fool..."
      Martha & The Muffins


    I stopped by the dock last week to get some pictures.  With Inky's passing, the April 15  Marina Opening Day passed unnoticed and unremarked.  Now I am playing catch-up.

Our amenities are installed :


The water level is higher than I expected, given our virtually snowless winter.


  At the time these pictures were taken the dock population was looking a little sparse.  Since, Rick has dropped in 20th Hole for another season,  James and Brooke have berthed The Instigator, Travis has snagged the slip next to James, Jim and Marianne expect to be splashing both boats this week, Jordan's boat Safira is ready to get wet now that Tempus Fugit is in the water over on Dock Two, Hilary's boat has arrived from Sarnia and is awaiting rigging and launching, Eric has repainted After School and built a new dinghy (more on that in an upcoming post) Jack is still deciding which boat is going to get wet first this year, JD has booked his slip, no word on Mark and Erica, Ralph and Julie and Gavin and Sylvia will be back rounding out the Siren fleet, did I miss anyone?


 New flotsam has appeared since last fall:


  I wonder if there is a tractor attached to that tire?


Soon,  we'll be home soon...

   New sailboat on the Dock.

   Travis'new ride:


    A recycling bin in need of rescue.


  True to form, we on Dock Six end up with the hoopty dock cart.


    Meanwhile, downtown Port Dover receives some attractive new signage:


   It's going to be a great season!

Low-Buck Tools: Gettin' Jiggy Wit It.

        "If there was a problem, yo, I'll solve it."
                                       - Vanilla Ice


       The skunkworks deep beneath Stately Jones Manor could best be described as a low-tech production facility for thrifty wood-based solutions to nautical problems.  However,  occasionally there is a need to solve a problem with the solution.

     Like how to make short wood longer.

    (Get your minds out of the gutter, folks.)

    Or how to drill a bunch of holes accurately and quickly.

    Surprisingly, not every tool is available at Lee Valley Tools .  Sometimes, you gotta build the solution to your problem.  I had a couple of problems like that recently.

   
    The Small Little Boat Company had a small real-money -paying refit job to accomplish over the winter- replacing the gunwales on a canoe.  This project presented some unique challenges, starting with the empirical/geometric hurdle of working on a 16' long canoe in an embarrassingly cluttered 15' long workspace.


  Once the logistics of the workspace were sorted, the scantlings of the job at hand moved to the top of the challenge list.  The canoe required ash gunwales with an uncommon rabbet  to conceal the top edge of the hull.    Unless the customer wanted to pay biggish money for one piece full length un-rabbeted gunwales and truly rapacious shipping costs to transport the 16+ feet long wood sticks from the Big Smoke to Stately Jones Manor, I was gonna have to improvise.

  So, improvise I did.

   My local NOSLY (Neighbourhood Old School Lumber Yard, for those of you who don't remember acronyms used in past posts, or AUIPP)  stocks local ash, a quickly disappearing stock thanks to the advance of the ash borer , in a variety of lengths... up to ten feet.  Time to scarph.

     Scarphing, or scarfing, (btw, note to readers:  do NOT Google "scarfing" with your safe search off.  Trust me).is a technique for connecting two too-short pieces of wood into one that is not, via a combination of  mechanical  and/or adhesive fastening and tapering the ends of the pieces to be joined, creating a seamless length,  like so:


    File:Woodworking-joint-scarf.gif


   courtesy of Wikipedia


     Simple, right?  It is.... except that the tapers have to be EXACTLY (or as close as possible) the same. If the angle or rise:run ratio varies, the piece will look like it has a waist or a belly and will not be straight. So, each end has to match.  I have eight of them to cut.  The chances of me getting even one correct taper working freehand is zero, so I needed a jig.

    Right on time, Good Old Boat publishes an article on building a scarphing jig.  Oddly for GOB, it was an article that was difficult to follow with few and poor photos. I thought I could improve on the design, so I set out to build my version.

   As is often the case in all things nautical, there is no hard and fast rule to the angle ratio of a plain scarph joint.  8:1, 10:1, 12:1, 15:1  have all been used by somebody somewhere and often the thickness and species of material in question plays a part..  The most common scarphing ratios, however are 8:1 and 12:1, so I decided to build a jig allowing me to make the cuts with my radial arm saw quickly and easily in both ratios.

  What does this 12:1 or 8:1 stuff mean?

Glad you asked.

A  ratio of 12:1 means that over 12" of length, there will be a rise of 1".  A one foot long ramp, would be only 1" high at the end if the ratio is 12:1, for example.

  So, to build my jig I grabbed some of my seemingly inexhaustible supply of scrap furniture-based particle board, and cut off a piece a little more than a foot wide, making the 12:1 layout easy.


  On one end I laid out a 12: 1 scarph, on the other end 8:1, and carefully marked them so I would remember which is which in the future...


    Setting the scarph ratios is simple math.  For 8:1, measure 8" along the edge and mark.  At the mark measure 1" in, then mark.  Use a straight edge to draw your cut line, from the corner extending past your "1" in" mark.  repeat the process for the 12:1 edge.


   Then I cut a couple of pieces of scrap to act as fences along the scarphing edges...


 Cut your scarphs and screw and glue your fences in place...


   Screw and glue fences on each end to allow clamping to the saw table fence.


    Now it is a simple task to quickly cut scarphs every time.Lay the wood against the fence, clamp to the table or the jig fence,  slooowwwwllllyyy draw the saw through the wood. Done.

    Once the scarphs were cut, the lengths were rabbetted and routed and finally epoxied together into full 17' lengths.


   Then they were sanded, oiled, oiled again, sanded, oiled yet again, and finally installed on the hull:


   The screws were bunged, the bungs were trimmed,


The whole works was sanded and oiled again, and out the door she went:


   Although this jig was designed with a radial arm saw in mind, it could also be used on a table saw, with the addition of t-track to the bottom of the jig, allowing it to slide along the table.

   Total time to build the scarphing jig:  40 minutes.
   Total cost:  $0.  If you don't have any discarded cheap furniture laying around and have to buy NEW cheap plywood or particle board, total cost will be under $20.


    I'm building a shelf for the hanging locker and I need some pin rail.   This is one of the few times in the maritime glossary that the same term has two different meanings, so a little clarification is in order here.

On traditional sailing ships this is a pin rail:


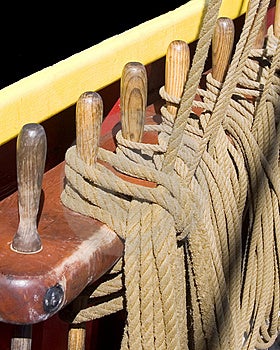
  Literally, the rail which houses the belaying pins.

  In my case, however, pin rail is a decorative and functional rail installed to boat shelves to prevent the objects stored on those shelves from becoming unstored when the boat moves.


image courtesy of ThaiTeak Marine


     Teak pinrail runs about $8-10 per foot.

    I don't need teak.

    I do need pinrail.

   (Not to go off on a tangerine here, but those of you who have been following our seemingly endless meddling improvements to Whiskeyjack  may have noticed the variety of woods used, with nary a mention of that stalwart maritime favourite, teak.  Lots of mahogany, some cedar, even some pine, some oak, some ash, but no teak.  My personal opinion is that teak below decks is often an unnecessary affectation.  The big upsides to teak are it's weatherability and wet traction, neither of which is a big concern above the sole below decks.  Note the use of the phrase "above the sole"-  teak flooring is an exception, but it's necessity in this application is debatable, in my opinion.  There are lots of other choices that will work just as well if not better than teak at a fraction of the cost.  And the variety of woods adds a little character. As George Buehler says in Buehler's Backyard Boatbuilding, "I like looking at various wood grains and stuff.."  Now, I have managed to scavenge an assortment of teak odds and ends from DonorBoat which may make an appearance in upcoming projects. Hey, I've got it, might as well use it.  But I wouldn't buy it.)


   Right, so back to pinrail.  If I don't want to buy it, I gotta make it.  Really, it's pretty simple stuff-  some spindles, a top rail and a bottom rail, and a bunch of holes... that all have to be exactly the same spacing on both top and bottom rails.

   Okeydoke, time to build a jig.

     I measure up my drill press table...
   Then I scavenge some more of that old cast-off  IKEA dresser that became a mitre saw extension , and I put together a drill press table, about 36" wide and about 8" deep.


   I installed a couple of  1x1" x 6" offcuts to the underside of the table as cleats which straddle the drill press table.  a couple of small clamps underneath hold the pinrail jig table securely to the  table.

  Now comes the finicky part.
  After measuring the pin rail already affixed to Whiskeyjack, I discovered that the height was a constant 3" the width was a constant 7/8", the top rail was 5/8" thick, the bottom rail was 3/4" thick...  and some rail had the spindles on 4.5" centers, others on 3.5" centers.  okay, so if I'm gonna build a jig might as well make a jig capable of building 3.5"  center pin rail and 4.5" center pin rail, AND might as well toss in 2.5" center capability too, just for giggles.

   So i needed to make an index block.  Determine where the holes should be, find the center of the rails, . determine the diameter of the spindles to determine drill bit size, etc.


  With my index block set, it is a simple matter to drill three holes 1" apart on another offcut  piece of IKEA dresser, and screw it to the jig's fence in the proper position as a center-setting block,  as determined by the index block.


  Drop an appropriate size bolt into the appropriate hole for the center desired to act as a stop.

 Making pin rail is easy.

  Rip two lengths of wood to the appropriate dimensions, then round the edges with a router or sander.

Lay the bottom rail  on the jig table. Butt up the end of the rail with the bolt, lift the bolt and tuck the rail 1/2 way under the bolt.  This sets up the first hole exactly on the desired center.  If the rail was just butted up against the bolt, that first hole would be off by half the width of the bolt.  Not a big deal, but it does waste a little material.  Drill the hole, lift the bolt, slide the rail down until the bolt drops in the previously drilled hole.

Keep going until you run out of rail.  Repeat the process with the top rail


    Sand and install your spindles.  Hardwood spindles can be bought in bulk for as little $.20 each, or if you want simpler looking spindles, cut your own out of dowel.  I bought the ones pictured below.  I couldn't MAKE them for what they cost- twenty two cents a piece.


  Total time to build the jig and make the rail shown above:  3 hours.
  Total cost:  $0 for the jig, $3 for the spindles.  If i had to buy the wood and the bolt to build the jig, material cost  would be under $20.
...Unless you use teak.

   This jig could also work with a hand drill, with one important modification-  enlarge the center -setting block to incorporate a drill guide.  In other words, build a block with one hole for the drill bit, and three more holes 2.5", 3.5" and 4.5" to the right for the stop bolt.


Thanks for taking the time to check us out.  Please feel free to "Talk the Dock!"  Link us, follow us, or just tell your friends.

Friday 13 April 2012

This is tough.

              "You know how I'll miss you..."
                                         -Neil Finn


           There will be one fewer dog in the Dock pack this season.

           Inky is dying.

          And it's hard.

          It's hard to watch a faithful friend fade.

          It's hard to see her eyes so full of will, with a body that isn't able to carry on.

          It's hard to throw out another meal she is unable to eat..

          It's hard to feel her frail bones resting in my arms as I place her in the car she used to leap into.

          It's hard to bear her stoicism in the face of increasing indignity.

          It's hard to accept that it's time.

         Inky had been slowing down for months, but she has such heart and grit and determination that I kept hoping that her "good" days would continue.

         She hasn't had a good day in a while.

         SWMBO and I have been discussing the options, and I don't think the choices could be more stark.  Try to keep her comfortable, and let nature take it's course, or make the decision to end her pain?  Tears have been shed.  I don't think this decision could be any harder if she was human.

         Yeah, I know, some will say, "it's just a dog."

         But she's not just a dog.  She's Inky.

        She is the loyal friend who is always there to listen, who is always happy to see me when I come home, who is content to sit on the dock and watch the sunset and allow me to scratch her behind her ears. She is a keeper of secrets and a fine judge of character.  She is both steadfast and stubborn. Next to my wife, she is my oldest friend.

       And I will miss her.

       Sunday will be Inky's Perfect Day .  She'll get bacon and eggs for breakfast, a leisurely walk on the beach, a long car ride, a cheeseburger or two, and a clean cozy fluffy bed with her favourite blanket by a warm fire at home.


    And tears will be shed.


   Inky passed away on Monday evening.  On behalf of SWMBO and myself, thank you for your kind thoughts and prayers.  Give someone you love a hug, and think of Ink.


Saturday 7 April 2012

Two-Burner Tastiness- Shoulder Season Savoury Supper

               "On my own, here we go..."
                                   -Green Day


         Spring and fall can be great seasons for boating.  The casual boaters are hauled out, it's too cold for PWC-bees, and  although wind is colder, it's more consistent.
 
        But, when it rains, it can be downright miserable.

        Warm food helps.

        Warm food that smells good and tastes better helps a lot.

        Warm food that smells good and tastes better with booze in it is always a winner.

         In other words, stew.

         The problem with stew on board is that it seems like every stew recipe calls for a crock pot, takes all day to cook, serves 30 people with leftovers, or all of the above.

         With a little experimentation, we created this recipe which is relatively quick, serves 2 and requires only one burner.


         Here we go:

        Whiskeyjack Beef Stew


1 pound (454g) beef on sale.  The cheapest cut you can find. Stewing beef not necessary.  I like to use cheap steak.(cut into 1 to 1½ inch cubes)
1/2 teaspoon seasoned salt
1 tablespoon olive oil
1 medium sized onion roughly diced
2 stalks celery, sliced
4 cloves of garlic, chopped
1 tbsp herbs de Provence (or 1 tsp oregano, 1 tsp basil, )
1 1/2 cups (.60 L) reduced-sodium beef broth
1/2 small can of  tomato paste
1 tablespoon balsamic vinegar
        1 bay leaf
1 teaspoon sugar
 salt and pepper (or Old Bay) to taste
1 large  potato,  peeled and roughly cubed into bite sized pieces
1 large carrot, chopped, or a half bag of baby carrots.
1 glass of cheap wine, or 1 bottle of cheap beer
2 tablespoons cornstarch
1/2 cup frozen green peas
2 tablespoons chopped fresh cilantro
        2 tbsp Worcestershire sauce

        1 tbsp soy sauce
 

         In a bowl combine the soy sauce and Worcestershire sauce.  Drop in the beef.  Let it marinade.  Drink a beer, or take this time to slice and chop and peel the veggies.  Work slow.  You want the marinade to do it's thing for a while.

        Remove beef from marinade, pat dry and rub in salt and pepper or Old Bay seasoning.  In a medium size pot over medium heat,  add olive oil, then drop in beef.  When beef is browned, remove from pot and pat dry again.


        Add celery, onions, garlic,to pot.
       
        When veggies begin to soften, add beef marinade to pot.
   
        . Return beef cubes to pot and stir in herbs de Provence. Toss in the tomato paste, vinegar, bay leaves, sugar, salt, and pepper and booze.   Bring to a boil. Reduce heat to low, cover and simmer for about 45 minutes to an hour. You want to cook this low and slow, stirring occasionally.  Your boat will start to smell GREAT!

         When a cube of meat is so tender it can be just about pulled apart with a fork, add the potatoes and carrots. Cover and simmer for another 20 minutes to  half hour,  until a potato can be cut with a fork. Mix cornstarch with 2 tbsp water until smooth. Add to stew. Stir well  and continue to cook until stew is bubbly and has thickened. Stir in peas and cilantro and cook just until peas are heated through, just a couple of minutes.

       Serve in bowls, with a basket of biscuits or rough cut baguette for dipping and wiping.


Tuesday 3 April 2012

Out with the Old, In With the New, Part 2: You don't know Jack.

                "Then you love a little wild one..."
                                       -Steely Dan


    I keep driving past Jack's ranch in the course of my day job, and finally found the time to stop in and poke around.

    I knew Jack had a problem, but I didn't know it was this bad...or good, depending upon your point of view.

 
  There are boats outside, like....
   ...A Northern 25 shell.  Want an ambitious project?  Come take it away.
 
   ... An O'day Tempest, Mcvay Bluenose, O'Day Mariner...


   ... Rainbow 24, Hughes 24, Nordica 16, another Northern 25, another Hughes 24 and another O'Day Mariner...


   ...Paceship Peregrine, unknown 70s "Sea Flea" type scooter,...

   ...and boats inside, like
   ...a McVay Minuet...


... and ANOTHER Bluenose hidden in Jack's secret lair.


Alongside the Minuet, tucked in with an antique lawn roller, is some of Jack's spar collection:


 Jack has discovered one of the truths of sailing classic plastic- it is often cheaper and faster to refit a boat by buying another boat to use as parts than it is to find and buy the parts not already attached to a boat.

And he can't resist a bargain. He will buy a boat just for the trailer, or the outboard, or the sails...and then have to figure out how to get rid of the boat!

$200 will take home a perfectly serviceable fishing boat just to get it off the trailer:


   Hanging from the side of the barn is the ground tackle collection, framed by Jack's homebuilt boat lift:


  Inside the barn, and the shed, and the garage are more than a dozen working outboard motors, cushions and winches and interior fittings and rigging and more crap and corruption than most boatyards...

  ...And Rancho Jack is on a hill 20 miles from the nearest navigable body of water!


  Jack is well known and respected among the local small boat crowd, and often has novices seeking his advice.  He does have ONE weakness, I discovered during our conversation-
He has only ever sailed keelboats! He says centerboard boats scare him.  A greenhorn with a new-to-him Grampian 17 centerboarder has asked Jack to join him for the shakedown cruise.  Jack has told him to come out to the farm first.
   "Maybe I can sell him that Rainbow 24, "  he muttered.


  On behalf of all of the other boat addicts out there, I'd like to take this opportunity to thank Jack for his service.  The example he has set makes the rest of us look so much better in the eyes of our long-suffering spouses, and provides valuable ammunition in the "just one more (boat, motor, dinghy, whatever) honey" battle.

  Speaking of which, his wife deserves to be nominated for sainthood.


Thanks for taking the time to check us out.  Please feel free to "Talk the Dock!"  Link us, follow us or just tell your friends.