Showing posts with label tools. Show all posts

Thursday, 1 January 2015

New Year Gear and Tool Review: Bonding with Bondic


"Now you oughta make it stick together..."
                                   -Wilbert Harrison


   As you know, Constant Readers, I basically have three modes- building stuff, breaking stuff, and sailing.

   (No, Smartass Reader, "drinking and eating" is NOT a mode.  It is an integral part of the Three Modes.)

   Intrinsic to successful functioning in any mode is the necessity to keep things from falling apart all around, you...

  .... and putting them back together when they inevitably do.

     Thus, I am  always looking for better, faster, easier, stronger ways to build what is needed and fix what is busted.

     Which is why I have an assortment of tubes and vials and bottles of various adhesives, of varying efficacy,  taking up real estate on my workbench and locker space aboard.  By and large, my go-to solution for most bonding jobs is epoxy of some sort, but one challenge with epoxy is that it has a LONG cure time, which makes it unsuitable for quick, clamp-free fixes.  Even quick curing epoxy isn't all that quick.

     Cyanoacrylate, the Krazy Glue-type stuff, IS instant, but that presents it's own brand of problems, because once two objects are stuck together they are stuck, like, NOW.  No repositioning, no time to get your fingers out of the way, or your sleeve, or to remember that you're working on a freshly refinished uncovered table...

     What if there was an epoxy that had the fast cure time of cyanocrylate, but only when you wanted it?


   Enter Bondic.

    The  folks at Bondic describe it as "the world’s FIRST liquid plastic welder."  There's all sorts of super-secret proprietary sciency stuff involved that makes it unique  but basically it is an ultraviolet cured adhesive.  What really makes it unique is how it works.

     The Bondic kit consists of an adhesive cartridge and a 6 volt UV light..... packed in a cigar sized shiny case.


packed in a cigar sized shiny case.


    It's as foolproof as an adhesive can get- clean the objects to be bonded, and sand shiny surfaces- this stuff likes a little "tooth, just like glue....


 apply a bead of Bondic to one surface, by gently squeezing the cartridge, just like glue...


Then, here's where things get different. Shine the UV light on your work for 4-8 seconds...


BOOM!  Cured, like a true believer at a tent revival.


  Because of the fast cure time, Bondic can also be used as an effective filler for small jobs, applied in layers, curing each layer.  Busted the corner of your cell phone case?  Sand,  apply Bondic, cure, sand, apply Bondic, cure, sand, apply Bondic, cure, etc.  as needed.

  Downsides?
 
  Because of the application system and UV light size, Bondic is best for SMALL jobs.

    And not many of them.  This review almost exhausted the cartridge.

    Tensile and shear strength is not Bondic's, er, strong point.  I bonded two scrap pine battens...


Then pulled them apart...  easily.


I then tried again, thinking that a thicker layered "fillet" might be more effective...


... it is...but not much.  The battens still came apart easily.

  Bondic IS waterproof, but, just like epoxy, it is sunlight sensitive- outdoor applications will need to be topcoated

  It's not a great structural fastening adhesive, but it has potential for effective, quick small repairs aboard- broken sunglasses, cracked vhf radio housing,  broken tangs on light lenses,  that sorta stuff.

  Cost?  The kit cost about $20, refill adhesive cartridges are about $12, a replacement UV light about $7.
   Not cheap, but cheaper than a new Otterbox for your iProduct.

Bondic likely won't be the first adhesive you reach for, but it might just be what you try when nothing else will work.


Talk the Dock!

Thursday, 18 December 2014

A Winter's Ponderings


"You'd be well on your way, if you could only set sail..."
                             -Kenny Loggins


Long nights, short days, water too hard to sail in, and an off-season maintenance punchlist with an emphasis on sanding, sanding, more sanding and refinishing leaves me with lots of time to think.

    (I’m not entirely sure this is a good thing- ed.)

     As I sand cockpit grates, cockpit tables and companionway doors preparatory to their semi-annual renewal coat of varnish, and consider new projects that will turn big pieces of wood into smaller pieces of wood and large piles of sawdust,  I find myself pondering: 

    Why do I do this, this varnishing thing? 

    Why don’t I use that newfangled synthetic, fast-drying, easy to apply, orangey-looking stuff that so many sailors swear by, that requires only two coats, and a lot less sanding?   It would take so much less time, and it works almost as well, and it looks almost the same and… 

…and it ain’t right.


    As I was laying down the finish coat, watching the varnish bring the grain to life, I realized that there is something zen about varnish.  The smell, the feel , the magic as it goes on, the connection to dozens of generations of boatkeepers who have gone before ,  doing the same off-season refinishing job, and likely asking themselves “Why?”


  Varnish is about keeping the fire.


  To me, that is a big part of the appeal of sailing:
  We're keeping the fire.

   But that fire grows a little dimmer, every year.

    Here’s what I mean:

    For millennia, sailing vessels were constructed of wood, with sails and lines of natural fibre, caulked and sealed with vile tarrish concoctions boiled over a fire from ingredients fit for neither man nor beast.  Legend says that any brew too thin to seal wooden boats was re-marketed to the pub trade under the brand name Guinness, and any goop too thick to caulk a hull was jarred and sold as Marmite.

(Hey, watch it! I like Marmite! – ed.)

    For centuries the traditions were handed down, from wright to wright and boatswain to boatswain, and while there was advancement in design, materials and construction methods stayed pretty much the same.    A 15th century boatbuilder would have gotten along pretty well in an early 20th century boatyard, since the tools and techniques hadn’t changed much. 

    Aboard, the same pattern held true.  Lanterns and lamps dimly lit the way for centuries, flags were the only option for communication beyond range of voice and navigation was an arcane art of sun shots and celestial scrutiny.

       The fire was kept, the torch passed, from one generation to the next.

      Then, in a span of less than five decades, the world of small boats saw more technological advancement than had been seen in the entirety of the past five millennia.
   Within the last half of the 20th century, fiberglass had virtually replaced wood as the material of choice for production boat building.  Aluminum had virtually replaced wood for construction of spars, electric lighting had virtually replaced lanterns and lamps, radio had virtually replaced signal flags and Loran, and then chartplotters, virtually replaced the sextant and dead reckoning.

    The  great naval architect L. Francis Herreshoff might have denigrated fiberglass as “frozen snot,” …but it turned out to be very successful snot indeed.

    Thanks to snot, boats could be built faster, with less skilled labour, requiring less maintenance.
    The upside was that sailing became a more accessible option for the everyman. 

    The downside was that the fire dimmed.

    Skills that had been passed down for generations, from sailor to sailor, became, first, quaint,…

   … and then forgotten.

    Quick, how many of us carry a full complement of signal flags aboard?  How many of us have caulking irons and mallets in our tool bags?

     How many of us know what caulking irons are?

     Now, don’t get me wrong- I love the reduced maintenance and longer lifespan of fiberglass hulls and alloy spars and synthetic sails, and I think my radio and chartplotter are wonderful tools to have aboard.  I appreciate that I DON’T have to keep caulking irons and mallets in my toolbag…

     … however, I draw the line at slathering the wood on my craft with some synthetic that is cheaper, and easier, and faster and almost the same, if you squint.

          See, I figure there is magic in boat work, a purity of process, an adventure of design and construction that envelopes the senses- the sound of the saw, the sight of brightwork glistening, the smell of varnish... it is poetry.

       Or maybe it’s just fumes.

       Whatever it is, it ain’t much, but I’m keeping the flame, as best I can.


"Talk the Dock!"


Sunday, 6 July 2014

New Boat, New Gear, New Reviews, Part One.

     "You got me coming up with answers...."
                                            -Duran Duran


A new (to us) boat means new projects and new, or new (to us), gear.
Refitting is a sailor’s excuse to go shopping…
….So, a-shopping we went.  
We needed to replace our no-longer-generating generator.  We had put off this purchase since halfway through Bottom Paint Season 2013, but the idea of sanding bottom paint by hand, on a deadline this year, thrilled neither SWMBO nor I. 
It was time.

Our old 3.5 kW Hyundai generator was  more than adequate, powerwise, but big, heavy and loud.   This time, we wanted a generator small enough, and portable enough, to make the occasional trip down the Dock to  put the power in power tools, and hang out on NextBoat’s* aft deck if we ever needed 110 power aboard when away from the Dock. The  Honda EU2000i was on our shortlist, and the Yamaha EF2000is was on our shorterlist, because it was slightly lighter and had all of the controls on the same face as the starting cord.
   The candidate tapped for a longterm test was neither of the above.  We opted to purchase a Champion 73531i 2kW generator.

Honda.

Yamaha.

Champion?

Here’s why:

     Both the Honda and Yamaha generators were $1200 and change. The nearest dealers are at least 25 minutes from the Dock, if we need parts or service.  If we decide to cruise with a generator, the nearby-parts-service-availability drops precipitously-most of the ports on the north shore of Lake Erie do not have either Yamaha or Honda dealers.  So,  if parts are needed, we’re gonna be pointing and clicking through the interweb and waiting for a delivery…

…  just like we would with an off-brand genny sourced from a department store…

… which we bought for under $600.

Additionally, I liked the stackable cube design- on the aft deck of Nextboat,  that flat surface could come in handy as a support for a cutting board, beside the bbq.


Upon opening the box, I was pleased with the fit and finish, and the feel of the plastic panels.


Nothing felt inordinately “cheap.”

The bib around the gas tank cap is a nice detail...

       As is the  well-marked "on-off " cap vent.    A closable vent is a nice benefit if (like me) you drive a station wagon that (like me) you do not want to smell like gasoline on a hot day with a generator in the wayback.

      It came with a well written manual in both official languages (okay, it was well written in English, at least;  mon ne pas parlez francais well enough to know how bon it was in French, eh?) and an easy-to-follow "quick start" chart, along with the ubiquitous stamped steel/crimped tube spark plug wrench and a funnel.  A funnel?


   Before starting, as the manual made clear in 118 point boldface, YOU MUST FILL THE ENGINE WITH OIL...  or void the warranty.  So I filled it, with oil, (not included) with the help of the (included) funnel, a requirement due to the location of the crankcase filler:
Behind a cover...

and, appropriately enough, at the crankcase:


    Preliminary prep out of the way, I opened the vent on the gas cap, turned the fuel valve to "on", flipped the ignition switch to "on", set the choke to "start" and pulled the starting cord.

    It started.
 
    Good.
 
     I pushed the choke in  and the generator continued to run.

     Also good.

     As promised, it was much quieter than our old generator.

     How quiet?

   
      That quiet.
     Carry-on-a-conversation quiet.
      SWMBO was impressed.

      That quiet.

      The next weekend we put our new box o' power to the test, and sanded Whiskeyjack's  bottom prior to rolling on a coat of antifouling paint.  SWMBO and I ran two palm sanders continuously for over 4 hours and used less than 3/4 of a gallon of fuel.  Further, our ears didn't ring, and we never had to yell at each other.
     Not yelling at each other is a real bonus, one not to be overlooked.

      I have no unrealistic expectations of longevity that rivals Champion's more expensive motorcycle manufacturer rivals, but...
 
       If it lasts more than 50% as long as the expected lifespan of the others, we will be money ahead.

      I will revisit this review next spring, and see how the Champion 73531i  has held up.


      Thanks for stopping by, and remember to

     "Talk the Dock!"


*NextBoat is currently named Take Time.  It is a nice name, but the experience of her acquisition begs for a name change.  More on that later.


Sunday, 11 August 2013

Low-Buck Project: Rig Tuning

   "Welcome to a new kind of tension..."
                             -Green Day


         A Friend of the Dock, Rod (Henceforth known as FOD Rod), is one of those boaters that we all know.
     Or wish we knew.
     Or hope to know.
 
      He's owned sailboats and powerboats and been comfortable on each, has run big boats and small boats, been a yacht club member and a dock rat, and has not developed, (or maybe lost) any prejudices regarding size, mode of propulsion or affiliation.  Over more than three decades, he's been there, done that... quietly.  He doesn't steer a barstool and try to command a room, he'd rather be polishing, or fixing or sailing his Catalina or piloting his Limestone.

      Along the way he's amassed some of the gear that we all wish we had, have thought about buying, or didn't even realize existed.

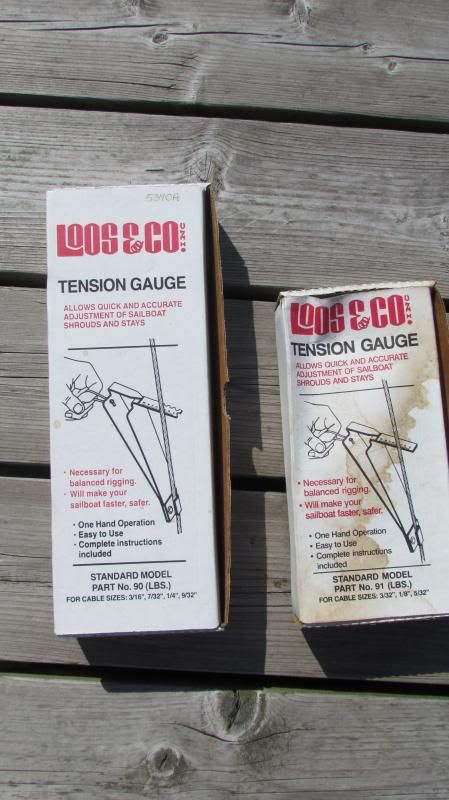
      Like Loos Gauges.

      One of the endlessly interesting (or numblingly, observing-paint-dryingly boring, depending) aspects of sailing is the myriad  infinite adjustments that can be made to a sailboat's rig, and the effect that the rig tension has on performance.  Some sailors like a loose rig, believing that it relieves strain on the mast step and compression post, others prefer a rig that is tight as a drum port-starboard, but with a lot of fore-aft adjustability, others like tight stays with loose shrouds, etc.,

     Me?  I've always tuned my rig by eye and by ear.  Tighten up the backstay until the forestay is tight and the mast has a nice rake, then tighten the lower shrouds until they all give me the same note when twanged, then do the same thing with the upper shrouds.

     (I like the upper shrouds to sound a half tone to a tone lower than the lower shrouds, but then, I like a lot of bass.)

      It always seemed okay to me, but I wondered- am I, maybe,  overtightening or undertightening my rig?  should I be concerned about a catastrohic failure, or could I maybe find another 1/10th of a knot and less weather helm if I cranked the turnbuckles another turn or two?

    FOD Rod mentioned that he, of course, had the tools for this, and kindly loaned me his Loos gauges.


       The process is simple, and takes little time.  The tools required are just as simple:


                   The gauge, and the tools you use to adjust your turnbuckles.

                   Testing tension is just plain stupid simple.  Clip the gauge to the stay or shroud....


      Pull the lanyard until the pointer reaches the black line....


  ... and note the number at the middle of the stay/shroud .


   Included with the Loos Gauge is an instruction leaflet, which includes a conversion chart for optimum tension, based on the diameter of the wire.  Compare your reading to the chart, then tighten or loosen the turnbuckles accordingly, rechecking until the tension is within spec.  Easy peasy.

    Turns out my tuning-by-twang was pretty close.  The uppers benefitted from another couple of turns on the turnbuckle, the backstay took three, the lower shrouds were spot on.

    I don't know whether it has made our galleon of a pocket cruiser any faster, but it's kinda cool to know that she is as optimized rig-wise, as she can get.


     Give it a try.


   "Talk The Dock!"


Sunday, 5 February 2012

Gear and Tool Review: Best Portable Bar Ever.

                          "I've got the bottle, bring me your cup."
                                                                -UB40


      So there you are, invited for vittles on a boat across the bay.  Being the good guest you are, you load a bottle or two and  some cheese and crackers in a bag , jump in your tender and get gone.  You arrive, climb aboard, and share out your lukewarm bottle, sweaty cheese and broken crackers.

     Impressive.

    Or say you want to go for a day sail with friends on your Siren.  You can load a cooler and a grocery bag, and wine glasses and ice and cutting board and cutlery and then you don't have room for your friends.

     Oooooh, dilemma- do we sail with our friends and leave the booze on the Dock, or take the booze and leave the friends?  It's an awkward choice.

     Here on the Dock, we've found the solution, thanks to the coolest cooler company ever, California Innovations .


    Meet Product #78124-90-09, or, as we know it here on the Dock, The Porta-Bar.  The Porta-Bar is a rigid soft-side cooler/picnic basket hybrid loaded with features.


  Open the front facing zippered "lid", and the first feature you notice is the thin plastic cutting board cleverly attached to the inside surface of the lid with stretchy elastic bands at each corner, making it both secure and removable for cleaning.

  Inside are three adjustable compartments.  The walls are easily removed and reinstalled thanks to the velcro tape fasteners.  Nestled inside these compartments are a tall bottle carrier,(Warm Bin) an insulated ice box/topload cooler (Chilly Bin), and a plastic bin with lid (Cool Bin).


   The Warm Bin will fit as many as three 40 oz bottles of rum, or two 2 litre soft drink bottles, or a vodka bottle and a Clamato juice bottle or  a bottle of wine, a couple of glasses and a baguette.   This baby is versatile!

  The Chilly Bin is cleverly designed.  Inside the soft bag is a plastic tub, perfect for holding ice cubes in addition to up to 12 soft drink cans.  To maximize cold life, the lid has a small velcro sealed hatch, perfect for quick soft drink extraction.

       Above the Chilly Bin is the Cool Bin, perfect for storing lemons, limes, cheese, sausage, sandwiches, all sorts of snacks.

    The handles are sturdy, the stitching reinforced and the fabric is easily cleaned.  The only quibble, and it is  minor, is the lack of a carrying strap.
     
      All in all, this is a pretty impressive package, especially at a retail price point south of $40. Like it?  Want one?   There is only one problem...

    According to California Innovations, Product #78124-90-09 is No Longer Available.  If enough demand is generated, they will consider putting it back into production.  Fire them an email, let 'em know you saw it here and you want one, bad.
Service@ca-innovations.com

Barring new ones rolling off the assembly line., my local Canadian Tire still has a few in stock.  If anyone wants one, drop me a line, and I'll set you up.

UPDATE:  I have sourced about a dozen of these, which I am happy to move on at $35 each plus shipping costs.


You know the drill.  Thanks for taking the time to check us out.  Please feel free to "Talk the Dock!" Link us, follow us, or just tell your friends.

Sunday, 15 May 2011

The Old Man Lends a Hand

     "That's when I need my father's eyes..."
                                            -Eric Clapton


     "You're just like your dad!"

     Ten years ago, that comment would have triggered an instant knee-jerk denial.  Nope, uh-uh, no way.  Me and him?  Worlds apart!  He is a methodical, fastidious, golf-playing, wine -drinking, analytical, engineering type, and I am, er,  not.  HE. PLAYS. GOLF. Hell, comparing a sailor and a golfer is simply a coded insult.
To both of us.
 
     Today, with the benefit of the hard-earned, dues-paid-in-full wisdom that passing the 40th birthday exit on life's highway has earned, I consider a comparison to my father to be a compliment.

     Somehow, somewhere, between adolescence and apparent adulthood, I stopped rolling my eyes at my father's advice, and began to seek it.  I didn't just hear him, I listened to what my dad had to say.  Occasionally, he even listened to me, because we had begun to speak a common language.
Wood.
    As I muddled through my latest low-buck project, I realized my dad and I had to talk the talk. Material for this project was tight, and I needed to make the most of it.  There was no fudge factor. I knew what I didn't know, and I didn't know enough to know how not to screw up this project, therefore I figured I'd avail myself of the man who likely knew what I didn't know, y'know?  Yeah, I could have bought some more wood and measure- twice-cut three-times through more stock than necessary until I figured it out, but that goes against the low-buck ethos of making do with whatcha got.
     So, I loaded my companionway- door project, all the raw stock I thought I would need, a smattering of tools and SWMBO into Leonard the Smart car and we headed off to the Jones ancestral estate to celebrate Mother's Day.
Halfway there, SWMBO and I both realized that we had left the Mother's Day card on the dining room table.  Etiquette-wise, this was just a whole mess of wrong.   No card, and a plan to bogart my father for an afternoon of making sawdust.  I am sure Emily Post has a chapter on this.
    "Happy Mother's Day, Mom!  Sorry, I forgot your card, but I brought a whole crapload of wood! Dad, can I use your workshop?"

    Something tells me this is gonna turn around and bite me in the ass at some point in the future.

    I skedaddle to my father's basement workshop with him in tow, and explain what I am building, how I think I should proceed,  and what the end result should look like, sketch out a couple of quick drawings and some dimensions.  Dad thought about it for a handful of moments, and then told us what we were really going to do.
He set to setting up his table saw and ripping stock, I set to watching.
    This is how it usually goes when I get my dad involved in a project.  There is only room in his metaphorical kitchen for one chef....
     And it ain't me.
     For over 30 years, my job has been to pull out the plug, sweep up the sawdust, nod and reply "Yep."  to any question asked.  I used to resent it.  Now, I get it.
Besides, I've learned a lot over the years, watching and sweeping.
    In short order the doors were laid out, cut, jigged, screwed and routed.  In the process I discovered another tool I just had to have, and made the rare discovery that I owned a tool that my father didn't possess- ha!  for the first time in years I can give him a Father's Day  gift that isn't in gift -card form!
    And we talked.
    Jones men are not the most communicative.  In fact, phone conversations between myself and my dad or my brother and I usually consist of:
"How are you?"
"Good.  you."
"Good."
"Good."
Pause.
"Talk to you soon."
 "Okay."
   But, when we have a paintbrush in our hands or a saw in front of us, my dad  and I become veritable chatterboxes.  We tend to talk to the work, not each other,  because we are there to work not socialize, but those occupational conversations are when I have learned the most about, and from, my father.  This project was no exception as I discovered the value of a pocket screw jig.
     I also rediscovered the value of an organized workspace.  It takes a lot less time to build something when you're not a) looking for tools, b) looking for stock, c) cleaning a space to work.  I used to lean on the -my-shop-is-too-small-to-be-organized excuse, but after spending an afternoon in my father's shop I realized that his workspace is not much bigger than mine, it just feels that way.
Here's mine:

  Here's my dad's:

He's got a rolling clamp rack, for pete's sake!

My tools are all over the bench, his are on a wall.

     And here's the doors we built together:
 After getting them back to stately Jones manor, I trimmed them out...


  ... and sealed them with two coats of epoxy:


Thanks, Dad!
And thanks, Mom, for allowing me to borrow him on Mother's Day.  Louise and I love you both.


Thanks for taking the time to check us out.  Feel free to "Talk the Dock!"  Link us, follow us, or just pass the word!